ShopDreamUp AI ArtDreamUp
Deviation Actions


Suggested Deviants


Suggested Collections


You Might Like…


Featured in Groups

Description
Alright now, the picture will help, but it is not complete. The rest of the instruction are in the artists comments. If you have any questions after reading this, feel free to ask.
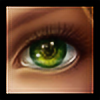
Before I begin however. I must say this. I am only giving a little bit of information about doing anime eyes. There are countless ways to draw eyes, there are countless eye shapes, personalities, and of course expressions, and I am not talking about any of these. I am only giving some basic guidelines that I hope will help you to find your own style. The eye on the bottom, which gets colored is completely different from the eyes in the rest fo the tutorial. It is Kojisai's eye, which is totally different from the eyes of any of my other characters. What I am saying is that while you will want to copy the technique, don't try to copy the lines I use exactly... I think you will get more out of this tutorial that way.
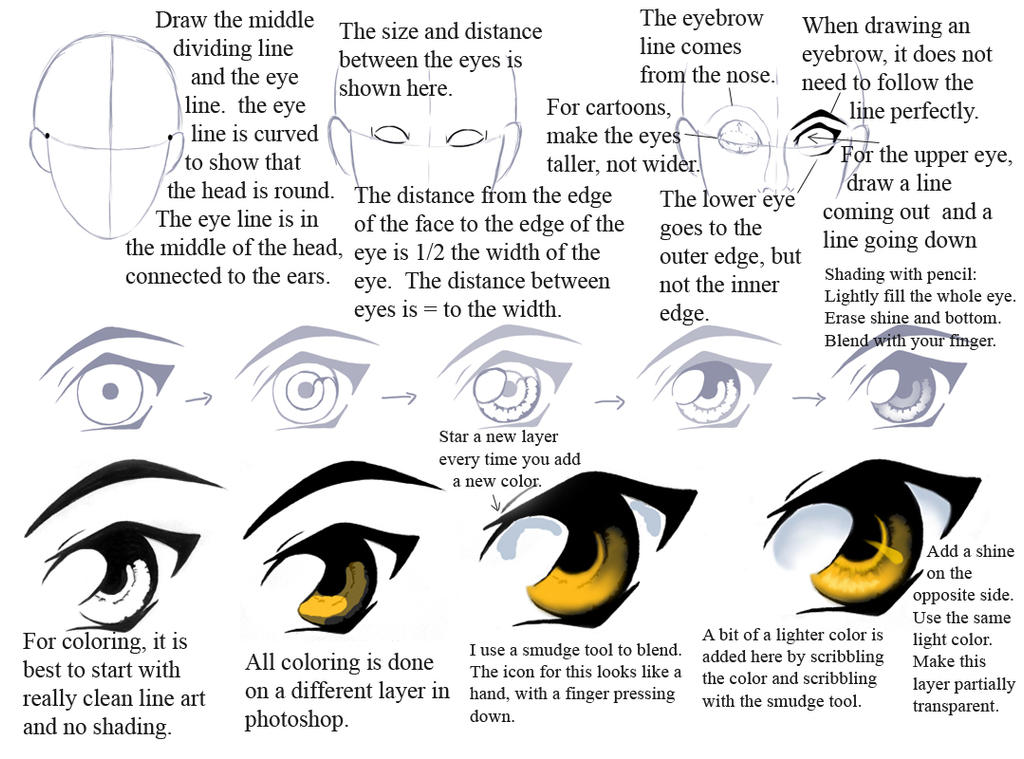
1. The first step in drawing an eye is often placing it correctly on the face. To do this, you need to draw the whole face, and even if you draw no other lines, a middle dividing line will help you and so will a lower eye line. The eye line splits the head in half, it is not high on the face or low on the face, but right in the middle. It is also curved because the roundness of a head can only be represented by a curved line.
2. When finding where along this eye line to place the eyes, there are certain dimensions to keep in mind. Keep in mind, this is a guide line. Not every face is exactly the same. But this really helps. You are going to need to break up the eye line into three equal parts and two parts on the ends that are one half the distance. The easiest way to do this is to make a mark exactly between the middle dividing line and the end of the face on both sides. Then make dashes that are of equal distance from each other. The space between the eyes is exactly the same distance as the length of the eyes. Try it with your face, you will see that this is more or less true. The space between the edge of the face and the edge of the eyes is perceived to be half that distance. Once you have the placement figured out, you can move tot he next step.
3. Before just drawing the eye, it is good to keep in mind the structure of the face around the eye. This will help make your eye feel more like it is sitting in a face rather then floating on a piece of paper. That is why whenever I draw any face. even though I erase the lines later, i draw the outline of the entire nose. This will define the cheeks and the eye sockets. Also, when drawing a face, it leads to the eyebrow line, which represents the actual ridge of the eyebrow. If you look at your face carefully, you will see that the eyebrow does sit on the ridge, but not perfectly, so when drawing the eyebrow, you can draw it so that it mostly sits on the line, but it is free to change shapes. The eyebrow is longer than the eye and so it will reach farther into the center and it will reach father to the edge than the eye itself. Drawing almond shaped spaces hep to define the eye socket as well. Wen drawing the eye itself, remember that with anime, they are usually much bigger than real eyes. Still, do not change the length of the eye, or else you run the risk of setting the eyes off the face or making the character cross eyed.
4. When drawing the iris and the pupil, I always avoid making ovals. I know that a lot of anime eyes are made with ovals, but the eyes, I feel look more believable when drawn with circles. Place the pupil in the center, make it small, because it is easier to make it bigger than it is to make it smaller. For the iris, the top and the bottom of the circle should go beyond the eye itself, so you won't be drawing the full circle... that is unless you want the eye to look surprised, angry or scared.
5. After that, I always draw another circle int eh iris, close to the pupil. Why do I do that? Look at your eyes int he mirror. You will see that there is a portion of your iris that is lighter, and it is actually divided by a noticeable line. This part is close to the pupil, and so by drawing this circle, I set myself up to add a detail that really brings out an eye.
6. Now you want to start working on the shadow and the light of the eye. remember that the light and shadow should be int eh same direction for both eyes... it looks silly if you don't do that. XD Anyway, I alway star with drawing a sort of triangle... remember to sketch lightly for all of this. The edges are rounded and the triangle is more of a bubble that sort of resembles a triangle. This bubble is a bubble of light, which touches the pupil and goes the the top of the iris and out to the edge of the eye. For now, draw the whole bubble. Next, draw the shadow line. If you look at real eyes, you will notice that the top part is almost always shadowed, because the light usually comes from above the the eyelashes act as shades from that. Draw the shadow so it comes out from the pupil, goes up a bit, but not all the way, and comes down to touch the outer edge of the iris. Draw a very slight indent in it where the middle circle is. Where the shadow touches the outer edge of the iris, you then follow that line with slightly jagged lines.
7. Color in or shade int eh shadow with black or dark pencil. If you are planning on inking it, wait until later to do so. As you do this, define the middle circle by replacing it with little sections of the circle in jagged lines and do the same with the outer edge of the iris. Make the part away fromt eh light bubble thicker. One that is done, you can erase the outer part of the bubble so that it feels like it is fading. For some drawing,s this is the finishing touch, but often, we like to ink our work or shade the eye, or even color it.
8. If you want to shade it, lightly scribble int he iris, darkest on top and no pencil at the bottom. Then take your finger and smudge the lines away. This works on normal paper with a number 2 pencil as well as other and finer tools. If you get some shading into the light part, that is okay, just erase a space that can stay white.
9. If you want it inked, this is when you vary careful trace your own work with a pen. IF you are planning on coloring it on photoshop or with any other computer coloring program, make sure that you draw very clean line art... it is okay to have a few imperfections because you can erase them once the picture is on the computer.
10. This part will be most helpful to those with photoshop, but if you plan on coloring it at all, there is still a little bit that you can gain from looking at the picture, because the colors will still need to be the same in the same places... it is just how they get there that will change. That being said, in photoshop, I do everything in layers. That way I do not mess up the clean line art. Make a new layer that is about 80% opaque. Start with a dark color. This color needs to be darker than the color of the eye. If you look at the eye in the tutorial, you might say that it is orange, but the color I have in the shadows is actually brown. Once you have that, make a lightened part with the color that you want the eye to be. Do not overdue this part. In some cases, less is more. Then you get black and you draw black over black and a little beyond it. This is for blending purposes and it doesn't need to be perfect.
11. Using a soft smudge tool, you blend the colors now. You will want to use different sizes of smudge tools for different areas, just like a painter needs to use different brushes sizes. Smudge the colors until they are perfectly blended. Then that a small smudge and drag the lightened area up around the pupil a little. This adds dimantion tot he eye.
12. For all other coloring, you will want mroe layers. On a second layer that is 100% opaque... solid... find a light grayish blue and place int eh shaodws of the light. By doing this, you add dimension to the light bubble and the white of the eye. Blur it, but be sure to keep a crisp line between the black and the edge of the color. On another layer, which can also be solid (100% opaque) using a thin paint brush trace the circle around the pupil with either a dark color similar to the one you used earlier or black, and then using a lighter color than the actual color of the eye, draw a little arch where the eye is brightest. Then take a very fine smudge tool and scribble, drawing streaks that shoot out from the center of the eye. Do not overdue this. You only want a hint of these lines to show, they are not ling and the are not thick. Finally, on one last layer, you can draw a shimmer int eh eye on the opposite side from the light bubble. You want this to be about 50% opaque. make sure that this is bent a little to show the roundness of the eye.
Finally, flatten the image. You are done. If you get confused with layers, feel free to flatten layers after you finish working with each set of colors. That is what I do.
I hope this helps, and as I said, if you have any questions, feel free to ask.
Drawing Anime Guide, click here
Before I begin however. I must say this. I am only giving a little bit of information about doing anime eyes. There are countless ways to draw eyes, there are countless eye shapes, personalities, and of course expressions, and I am not talking about any of these. I am only giving some basic guidelines that I hope will help you to find your own style. The eye on the bottom, which gets colored is completely different from the eyes in the rest fo the tutorial. It is Kojisai's eye, which is totally different from the eyes of any of my other characters. What I am saying is that while you will want to copy the technique, don't try to copy the lines I use exactly... I think you will get more out of this tutorial that way.
1. The first step in drawing an eye is often placing it correctly on the face. To do this, you need to draw the whole face, and even if you draw no other lines, a middle dividing line will help you and so will a lower eye line. The eye line splits the head in half, it is not high on the face or low on the face, but right in the middle. It is also curved because the roundness of a head can only be represented by a curved line.
2. When finding where along this eye line to place the eyes, there are certain dimensions to keep in mind. Keep in mind, this is a guide line. Not every face is exactly the same. But this really helps. You are going to need to break up the eye line into three equal parts and two parts on the ends that are one half the distance. The easiest way to do this is to make a mark exactly between the middle dividing line and the end of the face on both sides. Then make dashes that are of equal distance from each other. The space between the eyes is exactly the same distance as the length of the eyes. Try it with your face, you will see that this is more or less true. The space between the edge of the face and the edge of the eyes is perceived to be half that distance. Once you have the placement figured out, you can move tot he next step.
3. Before just drawing the eye, it is good to keep in mind the structure of the face around the eye. This will help make your eye feel more like it is sitting in a face rather then floating on a piece of paper. That is why whenever I draw any face. even though I erase the lines later, i draw the outline of the entire nose. This will define the cheeks and the eye sockets. Also, when drawing a face, it leads to the eyebrow line, which represents the actual ridge of the eyebrow. If you look at your face carefully, you will see that the eyebrow does sit on the ridge, but not perfectly, so when drawing the eyebrow, you can draw it so that it mostly sits on the line, but it is free to change shapes. The eyebrow is longer than the eye and so it will reach farther into the center and it will reach father to the edge than the eye itself. Drawing almond shaped spaces hep to define the eye socket as well. Wen drawing the eye itself, remember that with anime, they are usually much bigger than real eyes. Still, do not change the length of the eye, or else you run the risk of setting the eyes off the face or making the character cross eyed.
4. When drawing the iris and the pupil, I always avoid making ovals. I know that a lot of anime eyes are made with ovals, but the eyes, I feel look more believable when drawn with circles. Place the pupil in the center, make it small, because it is easier to make it bigger than it is to make it smaller. For the iris, the top and the bottom of the circle should go beyond the eye itself, so you won't be drawing the full circle... that is unless you want the eye to look surprised, angry or scared.
5. After that, I always draw another circle int eh iris, close to the pupil. Why do I do that? Look at your eyes int he mirror. You will see that there is a portion of your iris that is lighter, and it is actually divided by a noticeable line. This part is close to the pupil, and so by drawing this circle, I set myself up to add a detail that really brings out an eye.
6. Now you want to start working on the shadow and the light of the eye. remember that the light and shadow should be int eh same direction for both eyes... it looks silly if you don't do that. XD Anyway, I alway star with drawing a sort of triangle... remember to sketch lightly for all of this. The edges are rounded and the triangle is more of a bubble that sort of resembles a triangle. This bubble is a bubble of light, which touches the pupil and goes the the top of the iris and out to the edge of the eye. For now, draw the whole bubble. Next, draw the shadow line. If you look at real eyes, you will notice that the top part is almost always shadowed, because the light usually comes from above the the eyelashes act as shades from that. Draw the shadow so it comes out from the pupil, goes up a bit, but not all the way, and comes down to touch the outer edge of the iris. Draw a very slight indent in it where the middle circle is. Where the shadow touches the outer edge of the iris, you then follow that line with slightly jagged lines.
7. Color in or shade int eh shadow with black or dark pencil. If you are planning on inking it, wait until later to do so. As you do this, define the middle circle by replacing it with little sections of the circle in jagged lines and do the same with the outer edge of the iris. Make the part away fromt eh light bubble thicker. One that is done, you can erase the outer part of the bubble so that it feels like it is fading. For some drawing,s this is the finishing touch, but often, we like to ink our work or shade the eye, or even color it.
8. If you want to shade it, lightly scribble int he iris, darkest on top and no pencil at the bottom. Then take your finger and smudge the lines away. This works on normal paper with a number 2 pencil as well as other and finer tools. If you get some shading into the light part, that is okay, just erase a space that can stay white.
9. If you want it inked, this is when you vary careful trace your own work with a pen. IF you are planning on coloring it on photoshop or with any other computer coloring program, make sure that you draw very clean line art... it is okay to have a few imperfections because you can erase them once the picture is on the computer.
10. This part will be most helpful to those with photoshop, but if you plan on coloring it at all, there is still a little bit that you can gain from looking at the picture, because the colors will still need to be the same in the same places... it is just how they get there that will change. That being said, in photoshop, I do everything in layers. That way I do not mess up the clean line art. Make a new layer that is about 80% opaque. Start with a dark color. This color needs to be darker than the color of the eye. If you look at the eye in the tutorial, you might say that it is orange, but the color I have in the shadows is actually brown. Once you have that, make a lightened part with the color that you want the eye to be. Do not overdue this part. In some cases, less is more. Then you get black and you draw black over black and a little beyond it. This is for blending purposes and it doesn't need to be perfect.
11. Using a soft smudge tool, you blend the colors now. You will want to use different sizes of smudge tools for different areas, just like a painter needs to use different brushes sizes. Smudge the colors until they are perfectly blended. Then that a small smudge and drag the lightened area up around the pupil a little. This adds dimantion tot he eye.
12. For all other coloring, you will want mroe layers. On a second layer that is 100% opaque... solid... find a light grayish blue and place int eh shaodws of the light. By doing this, you add dimension to the light bubble and the white of the eye. Blur it, but be sure to keep a crisp line between the black and the edge of the color. On another layer, which can also be solid (100% opaque) using a thin paint brush trace the circle around the pupil with either a dark color similar to the one you used earlier or black, and then using a lighter color than the actual color of the eye, draw a little arch where the eye is brightest. Then take a very fine smudge tool and scribble, drawing streaks that shoot out from the center of the eye. Do not overdue this. You only want a hint of these lines to show, they are not ling and the are not thick. Finally, on one last layer, you can draw a shimmer int eh eye on the opposite side from the light bubble. You want this to be about 50% opaque. make sure that this is bent a little to show the roundness of the eye.
Finally, flatten the image. You are done. If you get confused with layers, feel free to flatten layers after you finish working with each set of colors. That is what I do.
I hope this helps, and as I said, if you have any questions, feel free to ask.
Drawing Anime Guide, click here
Image size
1080x800px 453.74 KB
© 2007 - 2024 manic-goose
Comments134
Join the community to add your comment. Already a deviant? Log In
Thank you so much for all the detail!